If you’re using or looking to use the LabEx Artwork Design Portal to upload your labels and ensure optimal print quality you’ve come to the right place.
Welcome to our comprehensive guide designed specifically you!
At LabEX, we understand that the key to stunning labels lies not only in creativity but also in mastering the tools that bring your vision to life.
Here’s we’ll break down and help you navigate the LabEX editor with ease, ensuring your artwork submissions are perfectly aligned with the highest print quality. Whether you're adjusting file sizes, selecting the right options for your label versions, or setting up your artwork in Canva for optimal print quality, we've got you covered.
Whether you’re a visual learner or prefer reading detailed instructions, by the end of this you should be empowered with the knowledge and skills to use the LabEX editor effectively and turning your creative concepts into high-quality, professional labels with ease!
Section 1: How to Set Up Files for LabEX Editor
Getting started with the LabEX Editor can be straightforward and efficient, as long as you're familiar with a few key concepts and steps. This section will guide you through setting up your files correctly in the LabEX Editor, ensuring that your label designs are not only visually appealing but also optimized for printing.
You can choose to watch our tutorial video, "How to set up files for LabEX editor."
In this tutorial we broke down the process, step by step:
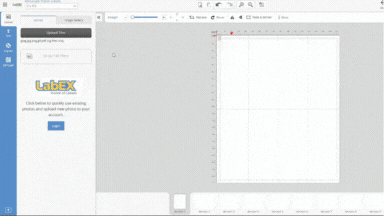
Step 1: Choosing the Correct Orientation
Start by selecting the orientation of your label: The LabEX editor defaults to landscape mode. If your label design requires a portrait orientation, you can easily switch by clicking on the portrait icon located in the top right-hand corner of the editor.
Step 2: Understanding the Lines
Be mindful of the 'Safe Line': The green line in the editor is your guide to keep all crucial text and imagery within safe bounds. This ensures that no important elements are cut off during the trimming process.
Know the 'Cut Line': Marked in red, this line indicates where your labels will be trimmed. Due to variations in the trimming process, it's essential to keep vital information within the green line for consistency.
Extend to the 'Bleed Line': The black line on the canvas's edge is your bleed line. Extending your artwork to this line prevents unwanted white edges after trimming.
You can always access the guidelines of what the lines mean in the editor here:
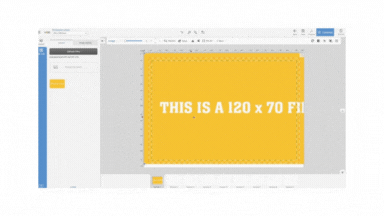
Step 3: Adjusting Your Artwork
Uploading and Positioning: Once your file is uploaded, you can drag and drop it onto the canvas or click on the file for automatic addition.
Resizing for Correct Dimensions: Adjust your artwork to match the desired label size. For instance, if you’re creating a 70x100 mm label but your file is 70x120 mm, you'll need to resize it to fit. Improper sizing could lead to important elements being cut off or excessive white space.
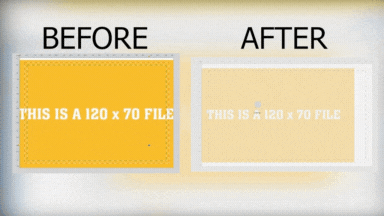
Step 4: Finalizing the Layout
Ensuring Everything Fits: Check that your key text and graphics are within the green safe line. The background should extend to the black bleed line to avoid white edges.
Adjust Label Size if Necessary: If your original artwork size doesn't fit the desired label dimensions, consider changing the label size to match the artwork, as shown in the video.
Step 5: Review & Finalise
Review Your Work: Once you have your artwork aligned and sized correctly, do a final review to ensure everything is as expected.
Ready for Printing: With these steps, your label is now set up correctly in the LabEX editor and ready for high-quality printing.
Section 2: How to Use Versions Option in Labex Editor
Next, let’s delve into the 'Versions Option' of the LabEX editor, a powerful feature for managing different label designs within the same project.
This tool is particularly useful when you need to print multiple variations of a label while keeping the design consistent across versions.
Watch out tutorial on "How to use Versions Option in Labex" here:
Now let’s break down the tutorial to guide you through each step:
Step 1: Understanding the Versions Option
Start by acknowledging the prerequisite: For the versions option to work effectively, all label versions must be of the same size. This ensures uniformity and consistency in your final printed labels.
Step 2: Creating and Managing Versions
Setting Up Versions: When you change the number of versions in your project, you'll notice the price updating accordingly. This feature allows for easy budgeting and cost management.
Adding Artwork to Each Version: Upload your artwork for each label version. Start with the first version, ensuring it fits perfectly, and then proceed to add artwork for the subsequent versions.
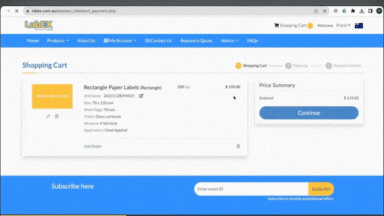
Step 3: Pricing and Quantity Breakdown
Understanding Price Changes: Be aware that as you add or remove versions, the total price of your order will automatically adjust. This dynamic pricing helps you understand the cost implications of each design choice.
Quantity Allocation for Each Version: After the design stage, you will be prompted to specify the quantity for each version. For instance, you might need 250 of version 1, 300 of version 2, and so on.
Step 4: Finalizing Your Versions
Review All Details: Before proceeding, ensure that all details for each version are correct, including the design, size, and quantity.
Confirm and Proceed: Once satisfied with the setup of all versions, confirm and proceed to the next step in the ordering process.
We highly encourage you to experiment and explore different version setups to find the best fit for your needs.
Section 3: How to Set Up Labels Artwork in Canva for Best Print Quality
Finally, let’s look at preparing your label artwork in Canva to ensure it meets the high-quality standards required for printing through the LabEX editor.
Watch "How to set up labels artwork in Canva for best print quality" here:
Now let’s walk you through the necessary steps to create print-ready designs:
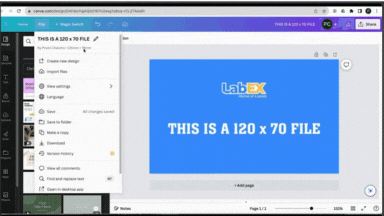
Step 1: Starting with the Right Dimensions
Initial Setup: Begin by creating your file in Canva with the intended dimensions for your label. For example, if your final label size is 120x70 mm, you should set up your file as 126x76 mm. This adjustment accounts for a 3 mm bleed on all sides, which is crucial for printing and cutting.
Step 2: Adjusting for Bleed
Understanding the Importance of Bleed: The extra space around your design, known as bleed, is essential to prevent unprinted edges after the cutting process.
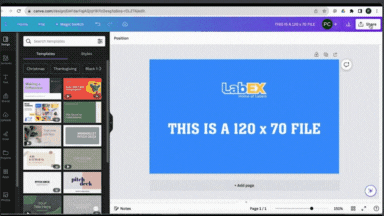
Using Canva’s Magic Switch Feature: If you haven’t included the additional bleed in your file, use Canva’s magic switch feature to adjust the dimensions accordingly. This ensures that your design will have no issues during the trimming stage.
Step 3: Downloading the File for Print
Selecting the Right Format: For the highest print quality, download your file as a high-resolution, print-ready PDF. In Canva, click on 'Share' and then select 'Download'.
Choosing the Correct Settings: When downloading, opt for the PDF Print option. Ensure all additional options are unticked and select the CMYK color mode, not RGB. This is crucial for accurate color reproduction in print.
Final Tips
Follow the Steps! These steps are key to ensuring your labels come out with the best possible print quality when used with the LabEX editor.
Insure you have the correct dimensions, bleed, and print settings.
Final Words: Empowering Your Label Design Journey
You should now be fully equipped with the necessary tools and knowledge to transform your creative concepts into high-quality, professional labels using the LabEX editor and Canva.
Let's take a moment to recap the key steps and insights we've covered:
In Section 1, "How to Set Up Files for LabEX Editor," we covered the importance of correctly setting up your label files, paying close attention to orientation, and understanding the significance of the safe, cut, and bleed lines.
Section 2 delved into the "Versions Option" in the LabEX Editor, where we explored how to efficiently manage multiple label designs, ensuring consistency in size and design across different versions.
Finally, Section 3 guided us through "Setting Up Labels Artwork in Canva for Best Print Quality," emphasizing the critical steps for preparing your designs with the right dimensions, bleed, and color settings.
With these tools and instructions at your disposal, you are now well-equipped to navigate the LabEX editor and Canva with confidence, ensuring that your labels are not only visually stunning but also optimized for print quality.
Experiment with different designs, layouts, and functionalities within the LabEX editor.
Your feedback is crucial for us to improve and tailor our resources to better serve your needs. Please feel free to share your thoughts, questions, or suggestions.